We’ve long had a love hate relationship with Logitech mice. On the one hand they’re ergonomically designed and feature the wonderfully useful hyperscroll wheel for sweeping through documents and web pages, but on the other they suffer from a fundamental fault after a few years of use, when the mouse buttons start to fail (note that other mice also seem to suffer from the problem, although we’re not sure whether that’s because they’re OEM models made by the Logitech factory).
Despite our rant four years ago, little seems to have changed, and the other day yet another mouse here, an M705, started failing again for the same reason. The symptoms are that the mouse click delivers two clicks for one press, which can be extremely annoying and renders the mouse unworkable for important tasks. This time, however, instead of consigning the device to the trash and buying another, we decided to see if we could solve the situation with a bit of DIY. And the answer is yes!
A quick search on Google revealed that other more intrepid souls had managed to fix their own meeces, and so we got to work on two ‘dead’ mice lying around in Ferret Towers, a Logitech M705 and an older MX Revolution. The first thing to note is that the culprit is tiny, a sliver of copper which can’t be worth more than £0.02p.
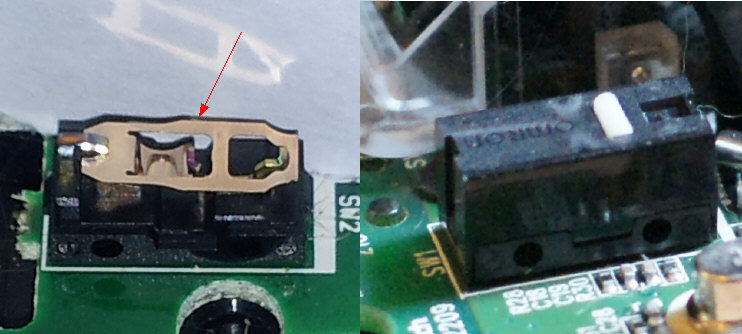
The actual spring mechanism is a tiny piece of intricately designed copper (top left in the image above) which sits inside the black microswitch housing on the right. What seems to happen over time is the copper flattens out through repeated clicking and once that happens, you start getting unpredictable results and double clicks etc. To fix the problem, you need to dismantle the mouse, open up the black switch casing and restore the bends in the copper to the original shape.
It’s hard but not impossible to do. You’ll need a steady pair of hands, patience and a small screwdriver and thin knife or blade. I fixed the two mice, the first took me 2 hours or so, the second (the M705) one hour. To be fair, I’m including here a link to the original Overclockers.com forum post I used, where they fixed a Logitech G7 mouse, so I won’t repeat everything. Just give a quick overview of the task for the M705. Click on the thumbnails to expand the image. [Update: I have now added this video below, to try and make things a little easier. Hope it helps.]
Oh and the usual disclaimer: You do this entirely at your own risk, DO NOT attempt it if you’re not at ease with electronic DIY and we are absolutely not responsible for what happens to your mouse, warranty, lifestyle or flowerbeds as a result.
The key thing to read and remember by the way is this comment. It is essential that you restore that tiny curve at the end of the copper mechanism before reinserting it.
Steps.
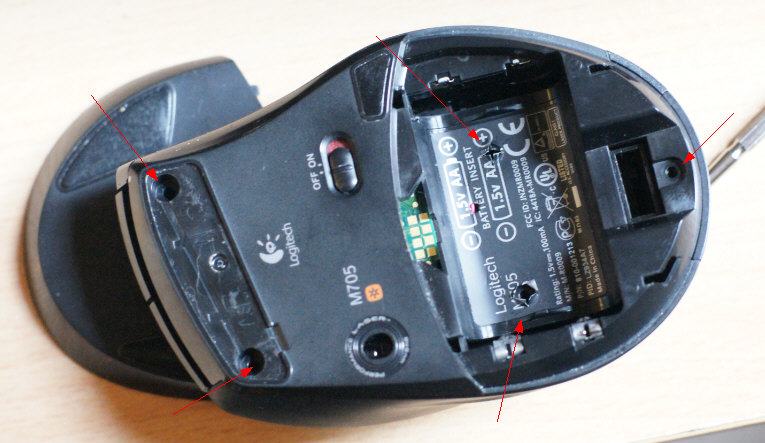
1. Unplug and dismantle mouse. You’ll usually find around 5 screws under the rubber feet and/or under labels. On the M705 they’re as arrowed below.
2. Once they’re removed you just carefully prise the mouse apart, taking care to gently remove the connected wire from the side.
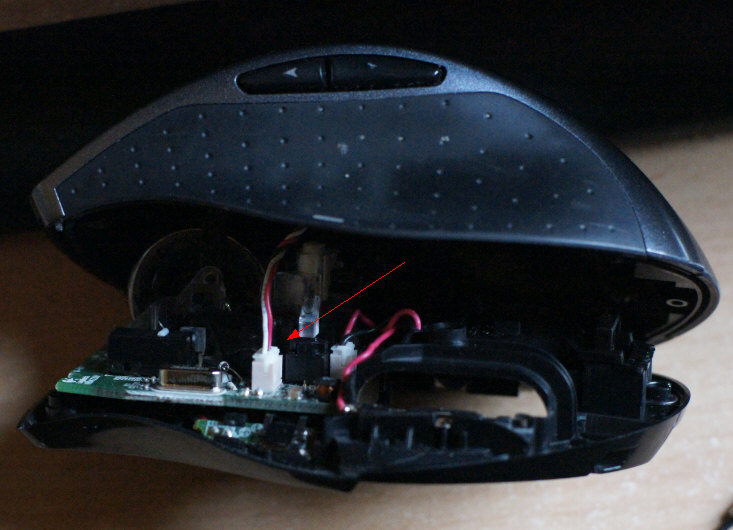
3. Once open, you’ll see the switch boxes (left and right mouse buttons) in front of you. In most cases the most common problem will be the left mouse button since that gets used the most.
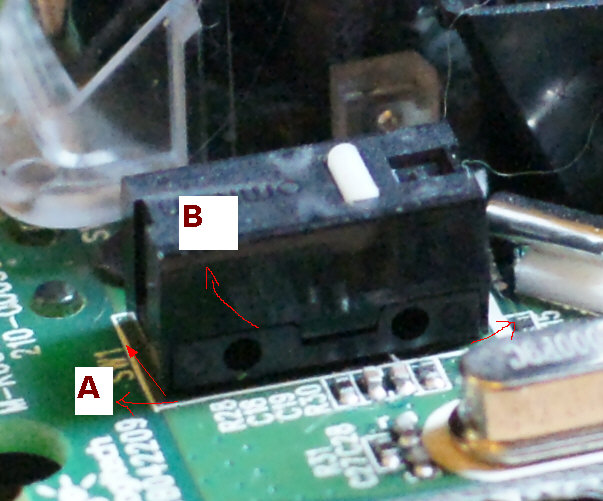
To remove the switch box cover you’ll need to get a thin blade under the catch on the sides (A), and gently (careful, they break!) lift the top (B) away from the switch body and upwards to prise it open.
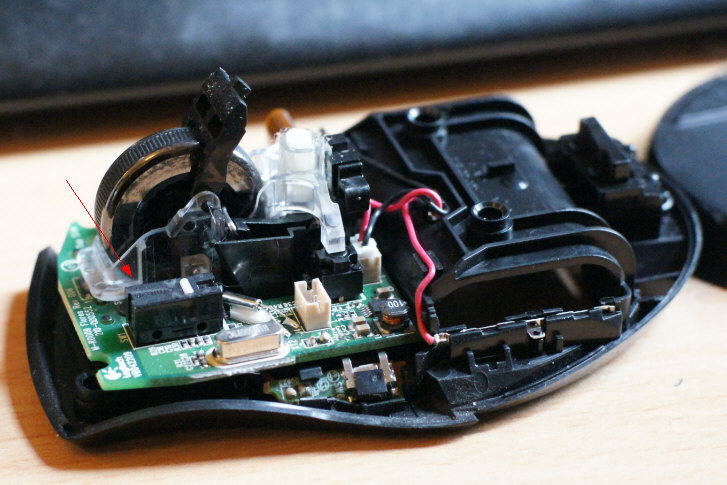
My earlier attempt on the MX Revolution mouse below (easy to scratch the cover getting it off, especially if you’re clumsy like me, but as long as you dont break the end catches, it’s fine.
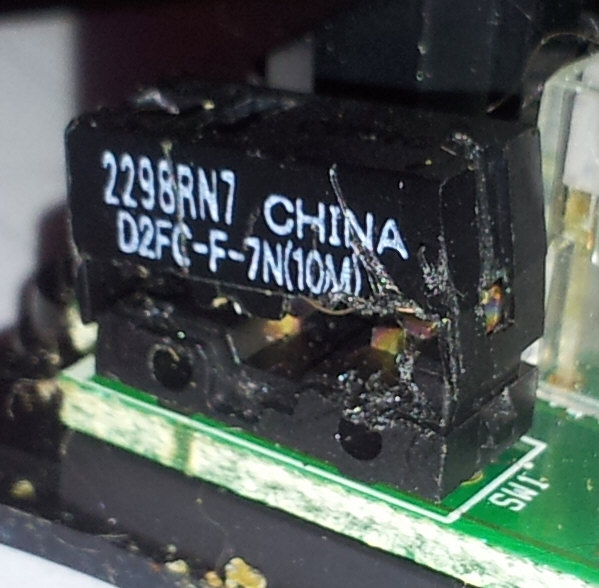
4. Once open, you’ll see the copper switch, which you remove with a gentle sideways push to dislodge it from its position.

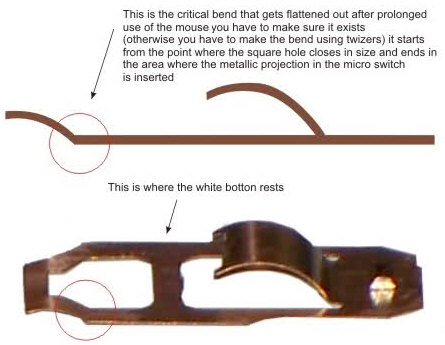
5. Now make sure the copper spring switch is flat, but with the nice curve on the middle curved part and a upward kink at the end as per the forum post above. The copper is very thin and malleable, so be careful, you can break it with just a bit too much pressure with your finger nail. In fact just a gentle tweak with a fingernail edge or a pair of tweezers is all you need.
6. To insert the copper spring back, put the front part of the spring back first (A), then gently curve the rear upwards and slide the whole thing into place under the rear catch.
The thing that confused me the most, until I opened the other switch to compare, is that the spring at point (A) actually slots into a tiny slot which catches and holds it. The other end just slides under the catch, so it’s different at both ends. Then the curved bit in the middle (C) slots into another slot in the middle to give the whole thing some tension. The end result should be that you can press down on point (B) and hear a distinctive click. If you can’t the thing isn’t installed properly, so you’ll have to keep fiddling until you find the tension.
See this video to get an idea:
and here’s my close up video of just refitting the copper spring which should also help –
This bit is undoubtedly the most fiddly part of the whole exercise, but once you get it right you’ll not forget for the next time. If you get stuck, re-read the whole of the above forum post again, all the clues are in there. If you lose the spring in error (they do tend to ping away if you’re not careful, you can pick up spare switches from eBay which should have the same copper spring inside.
7. Finally, reassemble the mouse in the reverse order and give it a test. You’ll be amazed at the fact that the thing works again properly. I should also mention that the forum post mentions a free software utility called MouseFix which is supposed to fix the problem with double clicking mice, but it’s very old and there’s no guarantee that it will work with anything other than Windows XP. Good luck.


Just found this site when my left mouse button started double-clicking on a single click after about 2 years of use. This issue is really bad when playing Jack Nicklaus Perfect Golf! Thought I should post since it looks like its been awhile since the last one! Thanks for the article and the video!
I tried to fix the switch, but then saw it was only like $5 for 10 switches on Ebay and wondered why was I trying to fix this thing? After receiving the switches in the mail, it only took 10 seconds to rip the old one out and put in the new one. Okay…maybe a bit longer because I literally had to rip the old one out as it was soldered under the wafer board. :-)
Great instructions. I would have never figured this out without seeing this post!
Worked for me G600. First time it wasn’t right and wouldn’t click so i tried again and 2nd time was the charm. 1 hour total time. Thanks.
Thank you so much for the breakdown! Every other tutorial totally stepped over the most important part, fixing the damn spring. The part that’s supposed to be bend down was bend up when I opened the switch. No wonder I wasn’t able to put the spring back in place.
thx so much for this tutorial, it seems my mouse is fixed now again. :-)
thank you