There are few things more enjoyable than messing about with a camera, especially one of the modern all singing video capable DSLRs. Not only are they super powerful, but they’re actually inspiring, because they get you to try new techniques and new types of equipment. One thing we’ve always wanted to play with is the camera slider, a simple but very effective rack which lets you produce great effects with the camera by adding lateral or front movement to your shots.
The problem is sliders are expensive, and at the top end ridiculously so . Even at the budget end you can expect to spend over $100+ for one of these products, which is a little too much for many people to put out just for the joy of experimenting.
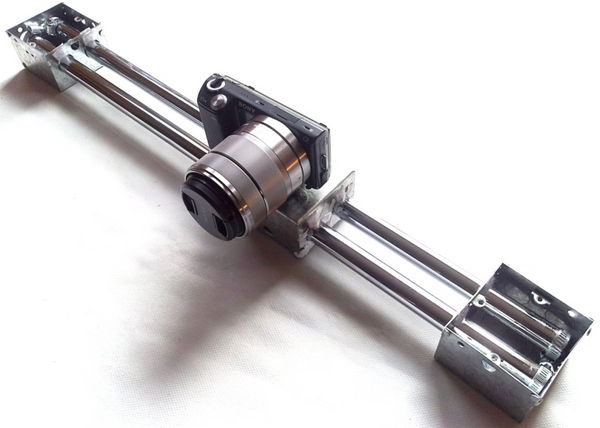
We found ourselves in this situation a while back, but instead of giving up we decided to have a go at building our own DIY camera slider. Because we’re precocious we decided to give it a name and a goal, which was to produce a really smooth result for as low a cost as possible. And thus was the Slinky Slidar born. You can see how to build it in the video below.
We confess to having been inspired by the numerous YouTube videos which offer DIY solutions , but we felt that all of them missed the point a little. The idea is to get a smooth result, so we decided to focus on that first, and looks second (and boy is the Slida ugly!).
The result is our baby looks like an African baboon’s rear end, but actually works rather well, smooth and almost silent. We hope you agree that the results speak for themselves, and have a go making your own. If you do, post your results in the comments and we’ll give a prize to the best one.
Instructions
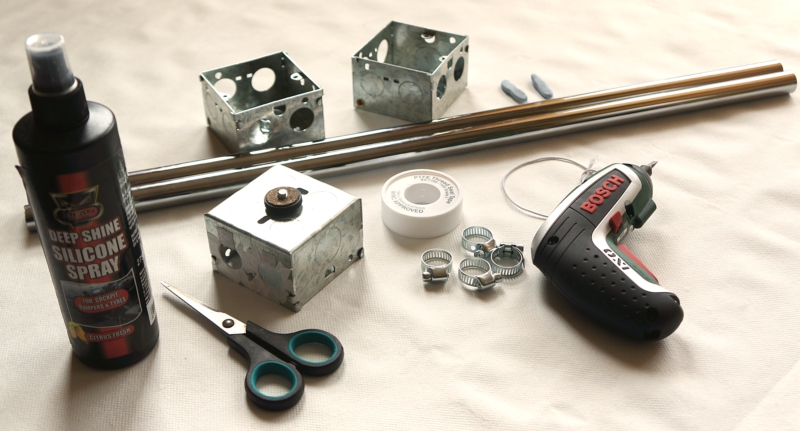
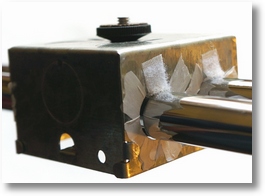
1. First catch your slida. You’ll need a 3/4 inch chrome tube pipe of some sort. We found a 1.22 cm pipe in the hardware section of a builder’s yard, which cost a mere £2.70 odd, which we then cut in half to make the two parts of our rack.
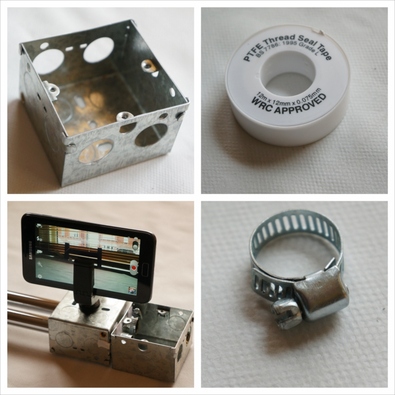
2. You’ll also need three metal or plastic electrical junction boxes, the kind which fit into a wall. They have holes pre-drilled in them which are perfect for accepting 3/4 inch pipe. Knock out the holes on all of them as per the video, and you’re set to go.
3. You gotta be smooth. A key part of our desire was to get a smooth result, so we looked around for ways to achieve that end. In the end we decided to use three techniques. First we tried some silicone spray on the pipes, and while it helped, it didn’t quite give enough. So we then moved on to gluing a little Velcro tape onto the holes to assist the sliding movement.
This also helped, but we needed more. So we turned to some Teflon tape (also called PTFE Tape) to make the connection between pipe and holes even more frictionless, and as a final flourish we used a car wax on the pipes to deliver extra silkiness.
We think we got it right.
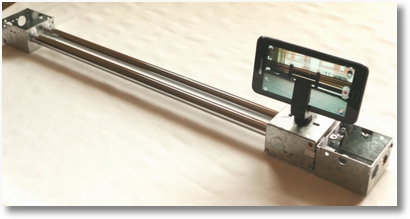
4. The assembly is surprisingly easy. Just slide the pipes through the holes and clamp them the hose clamps. The holes on the end piece should also have a single piece of Velcro on the top of each to help the pipe fit more snugly and not rock around. Once the pipes and the slider are in place you’re done.
5. The camera mount screw we took from an old small plastic tripod we had lying around, but you can get them from eBay for very little money, although you will need to drill out the hole in the slider box in order to fit it properly.
And that’s it.
Mount your camera of choice, make the slider as secure as you can (you can either bolt it to a piece of wood or bodge it as we did with some BluTack and you’re good to go. A lot of the trick to being smooth comes also from the muscle memory from pulling (or pushing) the slider box smoothly, so you’ll need to practice to get the best results.
We played around with all sorts of ideas, ranging from elastic as a pull rope to things we won’t even mention out of embarrassment, but in the end a simple camera strap worked best for us. The ideal would be to attach a small electric motor and winch of some sort of course, but that option was out of our pay grade.
You can see samples of the results in the video.
Parts List:
1. One 1.22 meter chrome tube (cut in half with hacksaw) – http://www.selcobw.com (£2.70)
2. Three electrical junction boxes – http://tinyurl.com/o93v9g4 – (£2.60)
3. PTFE Thread Tape – eBay – http://tinyurl.com/pm4bsqc – (£1.00)
4. Four Hose Clamps – eBay – http://tinyurl.com/np5of6u – (£1.00)
5. Tripod Mount Screw – eBay – http://tinyurl.com/pho8x5h – (£1.50)
5. Velcro Strips – (pennies)
6. Super Glue – (pennies)
7. Car wax (or other suitable wax) – (£?)
Total: £8.80


This is really cool and simple. Nice job.
Thanks. :)
Slida? haha.. try it in Swedish.
Hahaha, you know what’s even funnier? I’m married to a Swede. Hej hej.
Better than being married to a Cabbage.
If you ask at your local plumbers merchants for gas ptfe tape, you’ll get a thicker and more robust tape, normal ptfe thread tape is maddeningly flimsy.
Are you using chromed copper pipe, or chrome steel? 22mm copper has a smoother finish.
Not that I need one of these gadgets, but I’m now thinking of ways of making something similar. I’m lucky, though, that I have a tame plastics engineer who owes me a few favours, I’m thinking of machine Delrin bushes. Or Tufnol… And, as he owes me….. they’d be free!