We take a look at two current leading examples of the new wave of tiny computers to see if either of them are worth buying for everyday use as a media center in the living room.
The Raspberry Pi created a huge stir when it launched, and with good reason. The $25 tiny computer immediately grabbed people’s imagination because of its price, feature set, and above all, the lofty goal of offering a cheap and powerful educational tool for kids everywhere. It’s no surprise therefore that people have been buying the Pi and using it in a host of different ways, so we thought we would take a look and see if it’s really the computer you need if all you want to do is set up a simple media player for your living room television or similar.
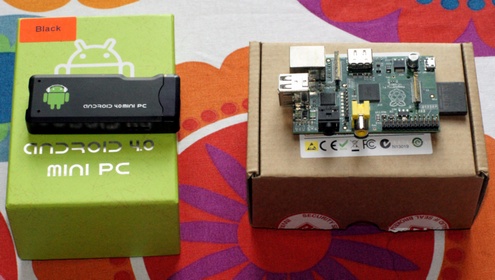
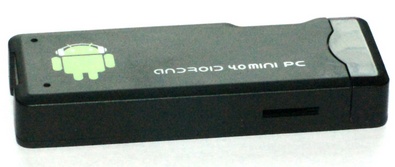
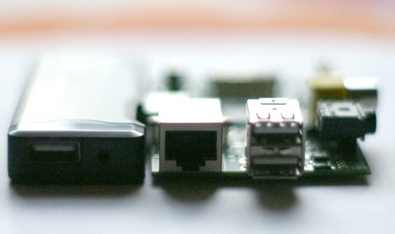
To provide some context, we thought we’d compare the Pi with a similar spec product which is gaining in popularity as well, the Android 4.0 Thumb PC, a $65 Android powered flash drive format computer which is designed to slot into your flat screen TV via the HDMI port.
First Impressions

The first thing you notice about the Raspberry Pi is the fact that it’s not going to cost you $25.00. Even accounting for the fact that the first models are the more powerful $35.00 units, which is all you can get, you’re soon faced with a menu of optional extras which are almost mandatory if you’re going to get up and running within a reasonable space of time.
You see, the big thing about the Pi, vs a ‘normal’ computer, is the fact that not everything runs with the version of Linux that’s recommended for the device. So it’s more than possible that your existing keyboard and/or mouse and other peripherals like USB hubs won’t work with it, which means you have to stump up for some compatible ones from this Verified Peripherals list to make it all work nicely. This costs money.
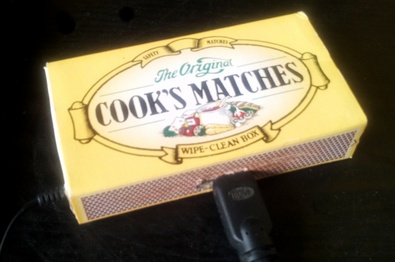
In the event we ended up adding a power supply, an SD card with the operating system installed, and grabbed a nice 3rd party wireless keyboard with touchpad . The order for the Pi kit alone therefore came to �49.09/$78.09 including shipping. Add in another �23.99/$38.00 for the wireless keyboard and �8.78/$13.97 for an Edimax wireless dongle (which is on the official compatible list) and it becomes even more of a dodgy value proposition. A grand total expenditure of �81.86/$130.21 for a fully working computer. Which is not quite $35.00. Luckily using an existing TV saves money on a monitor, although don’t forget you’re supposed to supply your own case and HDMI cable for the Pi since it ships as a bare board. We chose a matchbox motif for ours.
Nor can we say that the packaging you get for this price is that impressive. A plain brown cardboard box such as pizzas come in, with a couple of scraps of paper covering regulatory warnings. Now we realize that it’s early days for the Pi, and of course you may be able to do this cheaper, if;
a) You’ve got a compatible keyboard and mouse (and usb hub if required) lying around
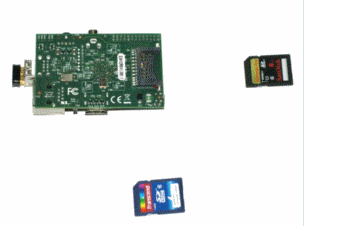
b) You are technically proficient enough to burn the Linux distribution onto a handy compatible SD card
c) You don’t need/want wireless and have an Ethernet cable
d) You’re confident that your existing USB power supply is compatible (again check the list)
Bottom line. That’s an awful long list of ifs, and a fair amount of time testing if any of the parts fails to work properly. The Raspberry Pi is most definitely a a knowledgeable enthusiast’s toy right now, and may well stay that way if the non-profit developer team (aka The Raspberry Foundation) stick to their cheap and cheerful vision.
Contrast this with the Android 4.0 Thumb PC which comes complete with a case, plus WiFi and operating system on board, and appears to work with just about any peripheral you can throw at it. The total cost of this computer to the door, including the same wireless keyboard is just �63.49/$103.00 including shipping from Hong Kong. And it’s ready to go out of the box with zero set up (more on that later).
Conclusion: Maybe the Raspberry Pi isn’t that much of a bargain for general use after all?
Raspberry Pi complete with wireless keyboard: $130.21
Android 4.0 Thumb PC complete with wireless keyboard: $103.00
In Operation
Now here’s where the fun really starts. For the purposes of this exercise we wanted to compare like for like as much as possible, so we chose to use the XBMC media center O/S installation, called RaspBMC, for the Pi, in order to compare performance and functionality with the media center friendly Android Thumb PC as closely as possible.
Before we continue, we should stress that this operating system flexibility is really the major strength of the Raspberry Pi…the ability to switch operating systems simply by swapping in a new SD card with a different operating system on board.
It makes the device flexible and powerful in ways that other systems with a fixed ROM based O/S can’t. But there is a price to pay for that flexibility, and it’s ease of use. We found the Pi to be an incredibly complicated beast to set up, simply because we’re not Linux savvy enough.
If you’re a Linux geek, you’ll love typing ‘sudo apt-get update’ and other similar stuff in a command line terminal every so often. For the rest of us, it’s a nightmare of impenetrable code. And modern Linux distros like Ubuntu and Pear OS show that you shouldn’t have to do that stuff any more, because it’s not necessary.
It took us 2 days of sweat and tears to get the Pi running the RaspBMC O/S with the wireless dongle, and it was only because we found this brilliant forum thread with a script so we could get it all working. As with Linux in general, it really is the community that makes the difference between getting things working and jumping off the nearest bridge. The Raspberry Pi crowd are superb, but you’ll still need to understand a lot of geek to grok what they’re saying when you ask a question.
If you don’t believe us, take a look at the script (below) we had to use to get the operating system installed and running on the SD card with WiFi, which you have to manually enter to get the system booting up into XBMC. It took us an hour or so to realize we’d missed a full stop in the instructions which was breaking things, so it’s daunting even if you’re familiar with command line code. Oh and you need to have a wired Internet connection conveniently near your TV (plus at least an hour downloading and installation time) to get it all working as well.
For newcomers all this is likely to be too much effort and hassle. As we said before, this is definitely not for the faint of heart.

In contrast, the Android Thumb PC slots in to the television’s HDMI port via a standard cable. Plug in the power cord, locate the source signal on the TV, and within seconds the Android logo pops up to welcome you to the familiar interface. Time taken to full operation from unboxing? Around 10 minutes. The trade-off is a lack of flexibility…think Mac vs PC. With the Android box you take what you’re given (Android 4.0.4) and that’s it. It works, it’s familiar and it offers only the usual limited settings options you’d get on a phone or tablet. But there’s also no complex configuration, testing, and hair tearing either. And it works with just about every peripheral and app. Bliss.
Continue Reading… 1 2 [View All]


All well and good, but will I ever be able to use the Android option to run RISC OS?
Android is wonderful, I'm not suggesting it isn't, but for a measly few pounds I'll be able to put a RISC OS computer in my pocket to take with me to while away the long, boring night shifts.
Aaaand…I rest my case. :)
More that one RISC OS fan reading this site it seems!
Don't forget that Raspberry PI wans't specially made for Media Player.. It is a learning and tweaking device… The Media player thing is a bonus. It is normal that any Android device would perform better as it was originally designed for multimedia/apps.
regards,
Zeto
Yes absolutely. However we thought that since there was a significant amount of interest in the RaspBMC option, people would like to see how well it actually performed in real life. The answer surprised us.
Have you tried the Xbian, instead of RaspBMC ?? It is a "derivate" of RaspBMC but much quicker. Besides that you now have a Overclock option in the raspi-config. Try it and let the community know your findings.
regards
Zeto
Yes I started with Xbian, and switched to RaspBMC because I couldn't even browse properly with that O/S. I didn't see the overclock option, so I'll try and take a look at that later.
I have a feeling that the overclocking will only marginally improve matters though, since it seems it's a lack of processor oomph and RAM that's really doing the performance damage. But of course I'm not an expert.
Hi again, I had a friend of mine who bought a Pi just for media player. He told me yesterday that the best software/os he could find (also the faster) was the OpenElec PVR (don't know exactly what version). Give it a try.
regards, Zeto
Hi Zeto, thanks very much for the tip.
I took a look at the recent announcement here – http://openelec.tv/component/k2/item/250-project-… – and one of the things that immediately strikes me is I'll have to go through yet another round of tedious configuration/script implementation to get the WiFi dongle working with this O/S (if I can find someone on the forums who has done it already).
It's just too much bother really. But I appreciate the fact that there are options, even if they're specifically for tech experts.
Any one help me i wana install media player for my android , but i have no idea how can i do that i also load setup for media player but its not running.
Excellent article – I've been looking for a media center / portable PC and the raspberry pi fans are so enthusiastic I was tempted to go ahead and just try it, given how cheap it was. Like you, I quickly discovered that the $25 PC was going to cost more more than $100 and didn't have the muscle to even play AAC audio. Thanks for sharing.
Hi,
If you install the raspbmc distro on a fast usb stick you should notice a signficant increase in performance. When installing the distro on your SD card just click the USB installation checkbox.
Cheers..
Perhaps the XBMC builds for the RPi have improved; perhaps the blog writer had a bad build. I am a non-techie and have no experience of Linux or XBMC. I was disappointed with the lack of apps on AppleTV and wanted to see what the excitement was about the RPi. I bought a Pi £30, Belkin wifi usb £9.99, Nokia charger, £2.99, transp blue case £5. I downloaded the XBIAN version of XBMC and used a GUI app on my Mac and installed it to a 4GB class 4 SD card. First boot worked perfectly, recognising the WiFi USB and responded to my Samsung TV remote with CEC, a keyboard is completely unecessary. I was able to install thirty add-ons in fifteen minutes including BBC iPlayer, ITV Player, 4OD, Demand 5 and several streaming video players. We've watched a half dozen catchup TV programmes and two full length 720p movies in the first two days. It is an amazing device and we've had only one programme hang – probably due to the fact that the version of XBMC I've downloaded is a nightly build. I'll be putting a stable release on another 4GB card and will see how it goes.
Riight…so you're a non-techie and you're talking about 'stable releases'? Wow, excellent. Glad you're enjoying it. :)
I would like to thank you for the efforts you have put in writing this blog. I am hoping the its same high-grade blog post from you in the future as well. In fact your creative writing skills have inspired me to get my own blog going now.
Excellent article and review! I now have made a decision about my real TV needs. Good bye Raspberry pi… hello android TV! now I need to find a good source of streaming tv and I’m all set!
this review is very outdated with the release of NOOBS for the Raspberry pi. All you do with it is copy the files from the archve to a sd card. stick it in the pi and power up. It can install differnt os’s for the pi onto the same sd card. I also must say that ive yet to find a USB mouse or keyboard that has not worked for the pi. And i had plenty of Spare USB chargers from my android phones laying about. The other points of the compaints were also rather moot. I think its time to redo the comparisons with the mondern releases of the Disrtos for the pi.
Thanks for the update, interesting to hear. Unfortunately I sold my Pi shortly after the review, so we haven’t got another one to test, but at least you’ve given some new context for our readers to chew over. Thanks again.